Plasma cutter gouging techniques

Plasma arc gouging (PAG) is the process of removing metal by using gas and an electric current to create a plasma arc. Plasma gouging is a variation of plasma cutting, where the arc is "defocused" through changing the orifice size in the plasma torch nozzle. A cutting arc is directed downward through the metal to blow the molten metal down and out through the kerf, forcing the two pieces of metal to separate. Rather than positioning the torch such that the arc melts and blows away molten metal to separate the workpiece, in plasma gouging, the torch is inclined at an angle to the workpiece, and the arc blows a groove on the metal surface, while the gases blow the molten metal off to the side. Different gases may be used, depending on the base material, to achieve the desired metal finish.
The predominant techniques used in the industry are carbon arc and plasma arc gouging because of their relative advantages.
Benefits of gouging with plasma
Plasma gouging has many advantages over oxyfuel and carbon arc gouging methods. It works on any conductive metal, including mild steel, stainless steel, aluminum, and copper. Plasma gouging is faster than oxyfuel and carbon arc gouging, delivering increased productivity. It provides more consistent and repeatable gouge profiles, requiring less secondary work such as grinding. Plasma gouges are free of carbon contaminants, eliminating carbon embrittlement in the metal.
Plasma gouging delivers stronger welds and better overall material integrity.
Plasma gouging is also better for operators. It requires less training time and has a shorter learning curve, enabling new operators to quickly become proficient. Plasma gouging has improved worker safety over oxyfuel and carbon arc gouging, with lower noise and debris levels to meet regulatory and workplace safety requirements.
Preparing to gouge with plasma
Operators use a variety of techniques to achieve different gouge profiles and sizes, whether gouging with a handheld torch or using a mechanized method like a track cutter. When gouging by hand, it is important to first ensure the plasma cutting system is properly set up.
To begin, make sure the plasma torch, work cable, and input gas supply are properly connected and the ground clamp is attached to the workpiece or table ground. Remember to always wear the appropriate personal protective equipment when operating a plasma system, including gloves, proper shade eye protection, hearing protection, and protective clothing.
Next, install the appropriate gouging consumables onto the torch based on the type of gouge you want to produce. Plasma systems like the Hypertherm Powermax® use gouging consumables designed to optimize gouging performance.
-
Maximum control consumables are designed for more precise metal removal, light material washing, and when a shallow gouge is desired. If you are learning to gouge, you may want to start with maximum control consumables to prevent any workpiece damage.
-
Maximum removal consumables are designed for aggressive metal removal applications, deep gouge profiles, and extreme metal washing. Faster gouging speeds are recommended to control the concentrated plasma arc.
-
Precision gouging consumables are designed for removing small amounts of metal or weld at very low output current.
-
Extended cutting and gouging consumables allow for easier access when gouging in hard-to-reach or confined workspaces
Many plasma cutters have a dedicated operating mode for gouging that adjusts the amount of pressure that travels to the torch. If your plasma cutting system has a dedicated operating mode for gouging, ensure that you set your system to gouging mode to begin.
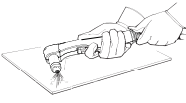
Gouging with a handheld plasma torch
The most common gouging technique involves positioning the torch at an angle to the workpiece, while the pilot arc is formed and transferred to the plate. Once contact is made, the operator aims or feeds the arc in the direction they want to gouge.
1. Hold the plasma cutter torch so that the nozzle is within 1.5 mm (1/16") from the workpiece before firing the torch.
2. Hold the torch at a 40 angle to the workpiece with a small gap between the torch tip and the workpiece. Press the trigger to obtain a pilot arc. Transfer the arc to the workpiece.
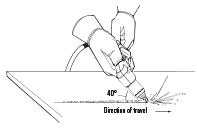
3. Maintain an approximately 40-degree angle to the workpiece as you move the torch along the workpiece, pushing the plasma arc in the direction you want to create the gouge. Keep a small distance between the torch tip and the molten metal to avoid reducing consumable life or damaging the torch.
Changing the gouge profile
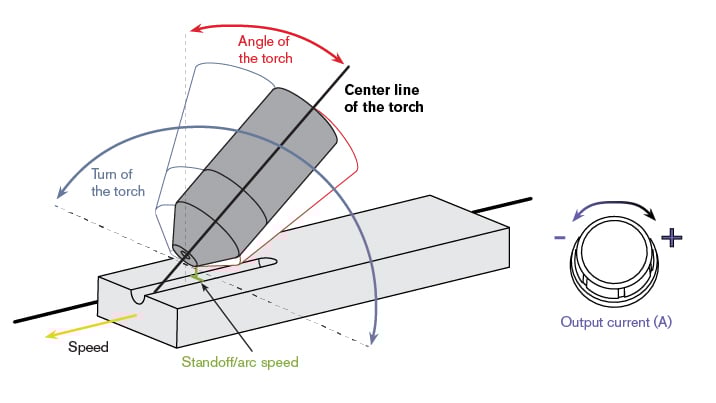
In general, you can change the gouge profile and the metal-removal rate by changing the speed of the torch as it moves along the workpiece, the distance between the torch and the workpiece, the angle of the torch to the workpiece, and the output current (A) of the plasma power supply. A summary of the effects of each is:
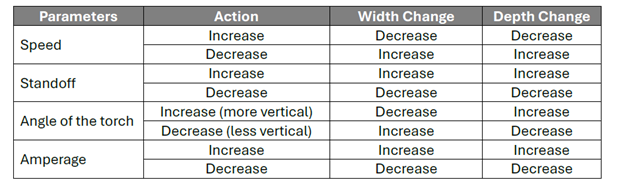
The following factors are the main “levers” available within a plasma arc gouging installation that affect gouge depth. While there are starting points for all parameters, there will likely be experimentation with each of these factors to get the desired results for a specific application.
Parameters affecting gouge depth when using plasma
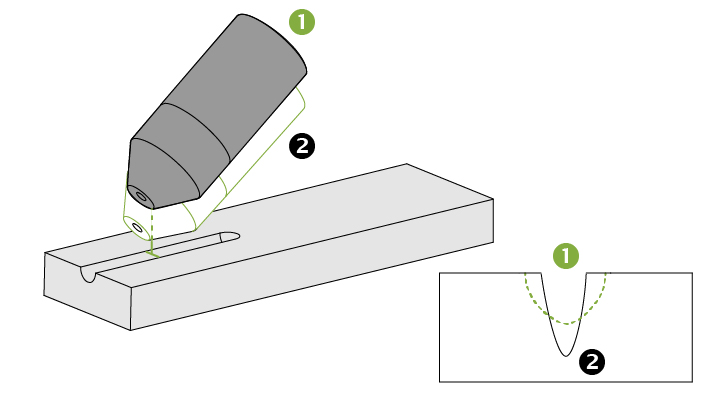
Torch height
Torch height governs the “arc stretch” or “arc shape” required to produce a smooth curved gouge profile. Note that arc stretch is also related to the amperage of the plasma power supply (covered below), in that the higher the amperage, the longer you can stretch the arc. Use torch height and amperage in unison to shape the gouge profile as desired. There should always be a small distance between the torch tip and the molten metal to increase consumable life and prevent damage to the torch, although this distance varies by system and amperage.
Move the torch away from the workpiece to make the gouge wider, shallower, and smoother on the bottom (1). Move the torch closer to the workpiece to make the gouge narrower and deeper (2).
Torch height effect on gouging profile
Torch angle
Torch angle has a significant influence on gouge depth. Typically set 30° to 35° from horizontal, the torch angle can be set as steep as 50°, but travel speed and slag management become critical as the arc can “dig in”.
Put the torch in a more upright position to make the gouge narrower and deeper (1). Tilt down the torch so that it is closer to the workpiece to make the gouge wider and shallower (2).
Torch angle effect on gouging
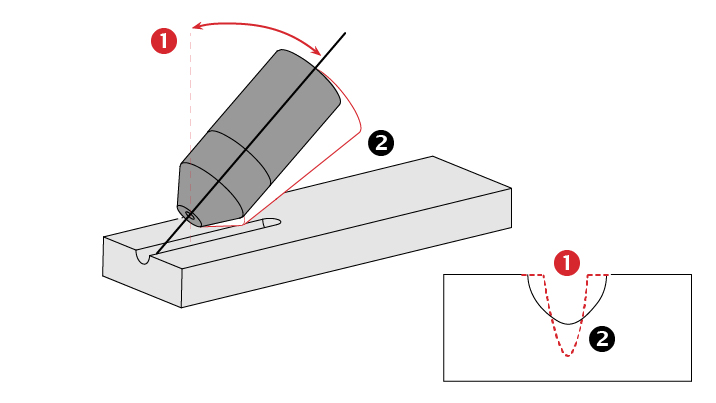
Note: For automated gouging, angle 1 is typically set at 52.5 degrees; angles larger than 50 degrees are typical.
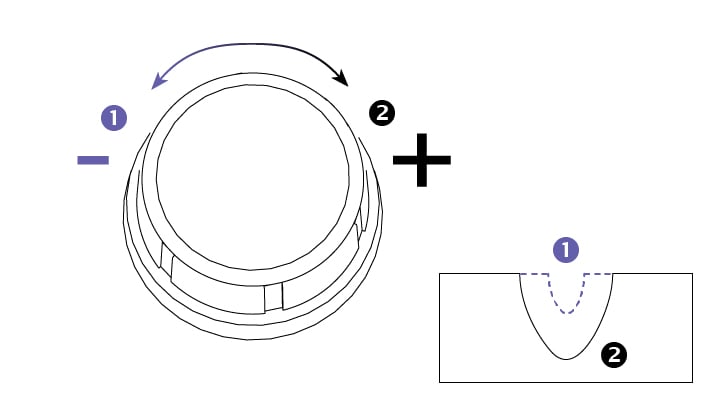
Amperage
Amperage has a significant influence on gouge depth and is the easiest, most controllable change to make. In addition, amperage of the plasma power is also related to arc stretch supply – the higher the amperage, the longer that you can stretch the arc. Use torch height (covered above) and amperage in unison to shape the gouge profile as desired. Decrease the amperage to make the gouge narrower and shallower (1). Increase the amperage to make the gouge wider and deeper (2).
Power supply amperage effect on gouging profile
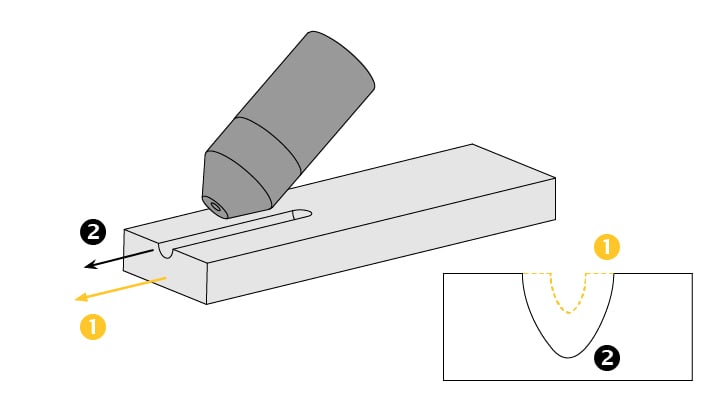
Travel speed
The travel speed of the workpiece and/or torch has a straightforward relationship to gouge depth. When reducing travel speed, however, slag management becomes important as the arc can “dig in”, producing more slag that adheres to the workpiece. Increase the torch speed to make the gouge narrower and shallower (1). Decrease the speed of the torch to make the gouge wider and deeper (2).
Travel speed effect on gouging profile
Parameters that affect the gouge width with plasma
The following factors are the main “levers” available within a plasma arc gouging installation that affect gouge width. While there are starting points for all parameters, there will likely be experimentation with each of these factors to get the desired results for a specific application.
Turn of the torch
Also known as Transverse Angle or Offset Angle. Torch turn, typically 3° to 5°, influences gouge width and shape when gouging in a straight line. Torch turn also assists in slag removal from the groove but can create a non-symmetrical groove if angle is too great. Turn the torch relative to the torch center line to make the gouge flatter and steeper on one side (1). The gouge profile will be flatter/steeper on the side nearest the direction that the torch body is turned.
Torch turn effect on gouging profile

Weave width
Increasing weave width will increase the gouge width, and decreasing weave width will reduce gouge width. To maintain a consistent gouge depth — increasing weave width will require a reduction in travel speed, and reducing weave width will require an increase in travel speed. Gouging width can be increased significantly by oscillating the torch in a circular or restrictive weave motion during gouging.
Weave frequency
A low weave frequency will need to be matched with a slower travel speed. If not, it can leave more of a “texture” in the gouge groove and may not have clean straight edges on the groove. A high weaving speed is usually preferrable as the groove is smoother and requires less grinding. It will also have smoother and straighter edges to the groove.
For more detailed information on achieving specific gouge profiles, refer to your system’s operator manual. For tips on how to improve gouging outcomes, visit Hypertherm’s extensive documents library and video library.
To learn how to maximize gouging performance with the Powermax plasma cutting system, contact a Hypertherm Cutting Pro.
