How to set up your Powermax65/85
The Powermax65® and Powermax85® are versatile and powerful plasma systems designed for cutting and gouging metal using either handheld or mechanized torches. These systems are easy to set up and operate, but you must always follow all safety instructions mentioned in the operator manual or illustrated on the label on top of your system. It is extremely important that operators fully understand and follow prevention methods to guard against electrical shock and to protect skin, ears, lungs, and eyes.
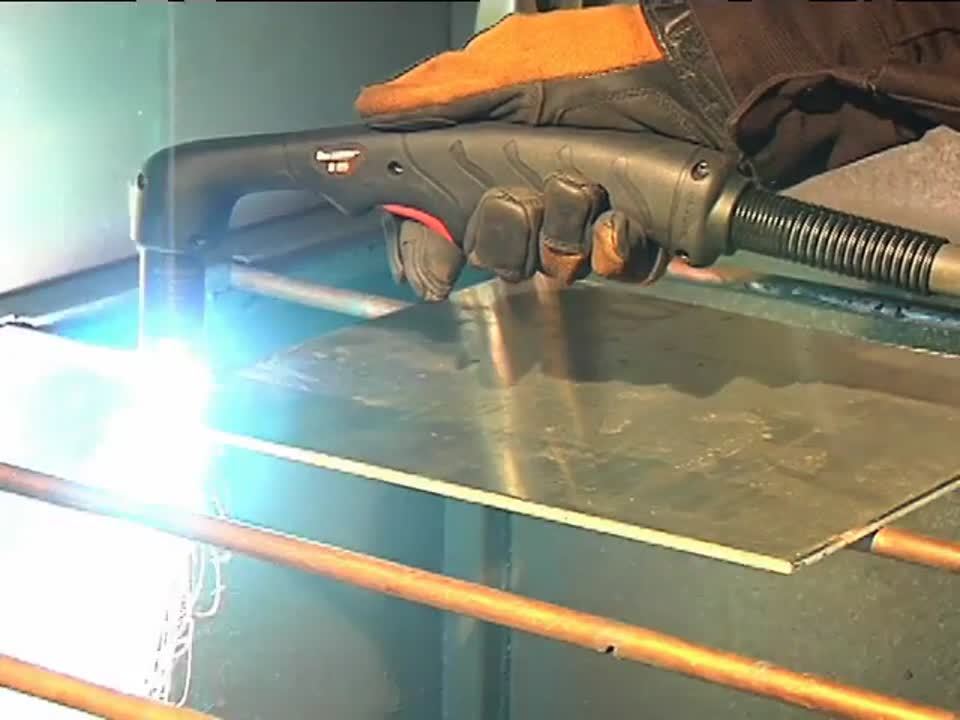
This video focuses on manual operations with a 75-degree handheld torch. The 15-degree handheld torch is shown when the operating technique differs.
Powermax65/85 initial setup
Setting up the Powermax65 or 85 for hand cutting operation can be done in six easy steps.
-
Check the installation of the torch consumables by unscrewing the retaining cap to remove the consumable parts in it. Replace the parts by first inserting the nozzle, then the electrode, then the swirl ring. Once the pieces are properly in place, screw the retaining cap on until finger tight. Do not overtighten the retaining cap or the consumables may become damaged and interfere with proper operation.
-
Connect the torch lead to the front of the power supply.
-
Pull back the quick release on the gas hose and connect it to the quick disconnect fitting. If the fitting does not match the hose collar, then the appropriate fitting will need to be installed.
-
The gas can be bottled nitrogen, bottled air, or compressed air.
-
Air should be filtered to remove all dirt, water, and oil because contaminants can damage the power supply, torch, and consumable parts.
-
The minimum gas pressure is 85 psi or 5.8 bar and should not exceed 135 psi or 9.3 bar.
-
-
Attach the work clamp to the power supply and secure it to the workpiece. Rust, paint, or coatings must be removed to ensure that the clamp has good electrical contact. The work clamp should never be attached to the portion of the metal that will fall away.
-
Plug the power cord into the proper receptacle and power on the system. The power lamp on the front of the system illuminates. However, depending on the model, the plug may not be attached to the power cord. If the installation of a plug is required, or the system will be hardwired to a power source, the work must be done by a licensed electrician. For input voltage requirements, check the data plate on the back of your Powermax system or refer to your operator manual.
-
Set the mode switch to the second setting for plate cutting. Powermax65 and 85 models are designed to sense the incoming air pressure, torch type, torch lead length, and mode of operation and then automatically adjust the air pressure. This feature, which we refer to as smart sense technology, ensures that the system is getting optimal airflow and results in better cut quality and prolonged consumable part life. If you want to manually adjust the air pressure for a particular application, and not use the default feature, please refer to the operator manual for more information.
Beginning with an edge cut
We are now ready to begin cutting. For full cutting power, turn the amperage knob to the maximum value. If you are cutting thin metal, the amperage can be lowered to improve consumable life, cut quality, and for less smoke.
To perform an edge cut, hold the torch vertically, just off the edge of the workpiece. Flip the safety trigger forward and press the red torch trigger. Avoid unnecessary starts because they reduce nozzle and electrode life. The pilot arc transfers to the workpiece and becomes the cutting arc. Pause at the edge until the arc has cut completely through the workpiece. Then, proceed with the cut.
The shield may be dragged on the workpiece for ease of cutting. When nearing the end of the cut, angle the torch into the direction of the cut to allow the arc to come out first. This ensures a complete cut.
Maintaining proper travel speed is key to successful cutting. Watch the arc beneath the plate. Sparks should lag 15 to 30 degrees behind the cut. If the sparks are vertical, then the speed is too slow. If the sparks are perpendicular to the cut or are spraying up from the workpiece, then the speed is too fast or the system does not have sufficient power. Lag lines on the finished cut edge should also be about 15 to 30 degrees.
A plasma cutting guide, straight edge, or template can be used to guide the torch. However, the distance from the shield center to the edge must be factored in when creating a template or placing a straight edge.
If you are beveling free hand or using an angle iron or a plasma cutting guide, remember the material thickness increases proportionally with the bevel angle.
If you are making long cuts, you may consider using the trigger lock feature. Set the mode switch to lock, which is in the bottom position. Once you have transferred the arc to the metal and have begun cutting, you can release the torch trigger and the arc will remain on. The arc will turn off once you pull the torch away from the metal or press the trigger again.
Piercing methods
Depending on the thickness of the metal you need to pierce, and the system you are using, there are two methods for piercing.
-
If piercing thin metal, hold the torch perpendicular to the workpiece and pull the trigger to transfer the arc.
-
If piercing thick metal, hold the torch at an angle so the nozzle is within 1/8 inch, 3.2 mm, from the workpiece. Pull the trigger to start the arc, then slowly rotate the torch to an upright position.
In both methods, when the sparks are exiting from the bottom of the workpiece, the metal has been pierced and cutting can begin. To prolong the life of the consumables, it is recommended that you use the second method to minimize damage to the consumables caused from molten metal blowback.
Cutting expanded metal
To cut expanded metal, or metal with a lot of holes or gaps, set the mode switch to expanded metal cutting, which is the top position. This enables the system to automatically reinitiate the pilot arc without retriggering. To cut, simply follow the same procedures as outlined for plate cutting.
Gouging
To gouge, first turn off the system and install gouging consumables. Then, restart the system. Set the mode switch to gouging, which is next to the bottom position. The air pressure will automatically be lowered for gouging. Adjust the amperage knob to 65 or 85 amps for full gouging power.
If you want to move the torch at a slower speed for greater control, then lower the amperage. Hold the torch at a 45-degree angle from the workpiece with a small gap between the torch tip and the workpiece. Then, pull the trigger to transfer the arc. Maintain this angle and slowly move the torch along the workpiece to remove unwanted metal or weld.
If a shallower gouge is desired, decrease the angle of the torch. For a deeper gouge, increase the angle of the torch or make additional passes.
Optimizing cut quality and consumable parts life
Cut quality and consumable life are two very important factors for operators. To ensure that the torch consumables last as long as they are designed to last, and perform to Hypertherm specifications, follow the instructions in this video. Refer to the operator manual for more information and follow proper maintenance procedures.
A number of factors determine how long consumables last, including air quality, piercing technique used, length of average cut, operator skill, material thickness, and material type. Reduced system performance and cut quality are often caused by poor air quality, so be sure to maintain clean, dry, oil-free air.
Hypertherm offers a variety of accessories designed to enable you to get more out of your Powermax and protect your investment. These accessories include air filters, plasma cutting guides, leather torch sheathing, system dust covers, face shields, gloves, consumable kits, and carts.
For more information about any Hypertherm product, please contact an authorized distributor or visit Hypertherm’s website.