Electrode holder mounting nut instructions
Posted on
21/01/2019
Posted by
Posted by
These instructions are part of the installation of the Centricut® quick–change torch for ESAB® systems. They detail proper installation of the electrode holder mounting nut. The mounting nut is a key feature on the torch that allows customers the flexibility to use either PT-36 or PT-600 consumables in one torch head.
Parts
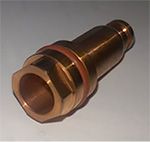
Mounting nut
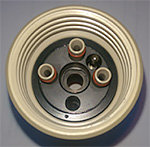
Torch head
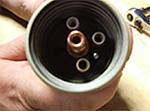
Installed mounting nut
Procedure
- Lubricate all visible o-rings on torch head and mounting nut before initial installation.
- Inspect the mounting nut and back end of the torch head:
- The wider end of the mounting nut has a square shape
- The insert in the center of the back of the torch head has the same shape as the wide end of the mounting nut.
- Insert the mounting nut into the back end of the torch head. Turn, wiggle and push the nut until you feel it seat in the insert. The o-ring on the mounting nut will hold the nut in place.
NOTE: When the mounting nut is installed properly, the torch head will sit flat on any flat surface when turned upside down.
Properly installed mounting nut

Improperly installed mounting nut
Posted on
21/01/2019
Posted by
Posted by